Turning the unlovable into the fabulous- Pumpkin style
Back to that fall dinner table I started talking about two weeks ago...so, we started with the burlap runner. It was easy, cheap and it added so much to the table. Honestly when we started Recipe Club almost a decade ago we went all out to decorate but things have slipped by the wayside as we've gotten busier with kids' schedules and such- we focused more on food and fun (and booze...of course, with the booze) but sort of did away with the decorating. I wanted to really bring it back. Not only am I a Nazi when I host (oh yes, I've made them all dress up as Grecian goddesses and in Halloween costumes in addition to bringing their food!) but I look at it as a challenge- a time to do something to my house that I would never otherwise do. My kids barely slow down to eat and wouldn't even notice if I put out a centerpiece so why waste the energy, right?
OK...so the runner? Check. Done.
Next up...what to do in the middle. I had an idea. The first thing I needed to do was round up a ton of pumpkins. They had to be small enough so that people wouldn't be trying to look around a pumpkin to talk across the table (nothing more annoying that having to strain to look over a centerpiece to talk to your dinner companions #thestruggleisreal) and I, of course, had an idea in my mind that I wanted all different sizes. I hit up Goodwill, Savers, St. Vinnie's and of course, my favorite spot- The Dollar Tree. You would not believe what an epic treasure trove that place can be. By the time I collected all of my pumpkins from the urban retail pumpkin patch I had a collection that looked like this...

 Super class and pretty, right? I mean it's not totally obvious that all of these pumpkins were like a dollar each or under is it? OK, really, it's a pretty abysmal collection of cheap overly bright foam pumpkins and some weird painted ones circa 1993.
The good news is that I had an arsenal of crafty type supplies to help give these pumpkins a makeover that would put the Elizabeth Arden counter at Macy's to shame- a little blush and some mascara can really only do so much in terms of a make-over, try spray painting the shit out of someone's face- THAT'S a makeover.

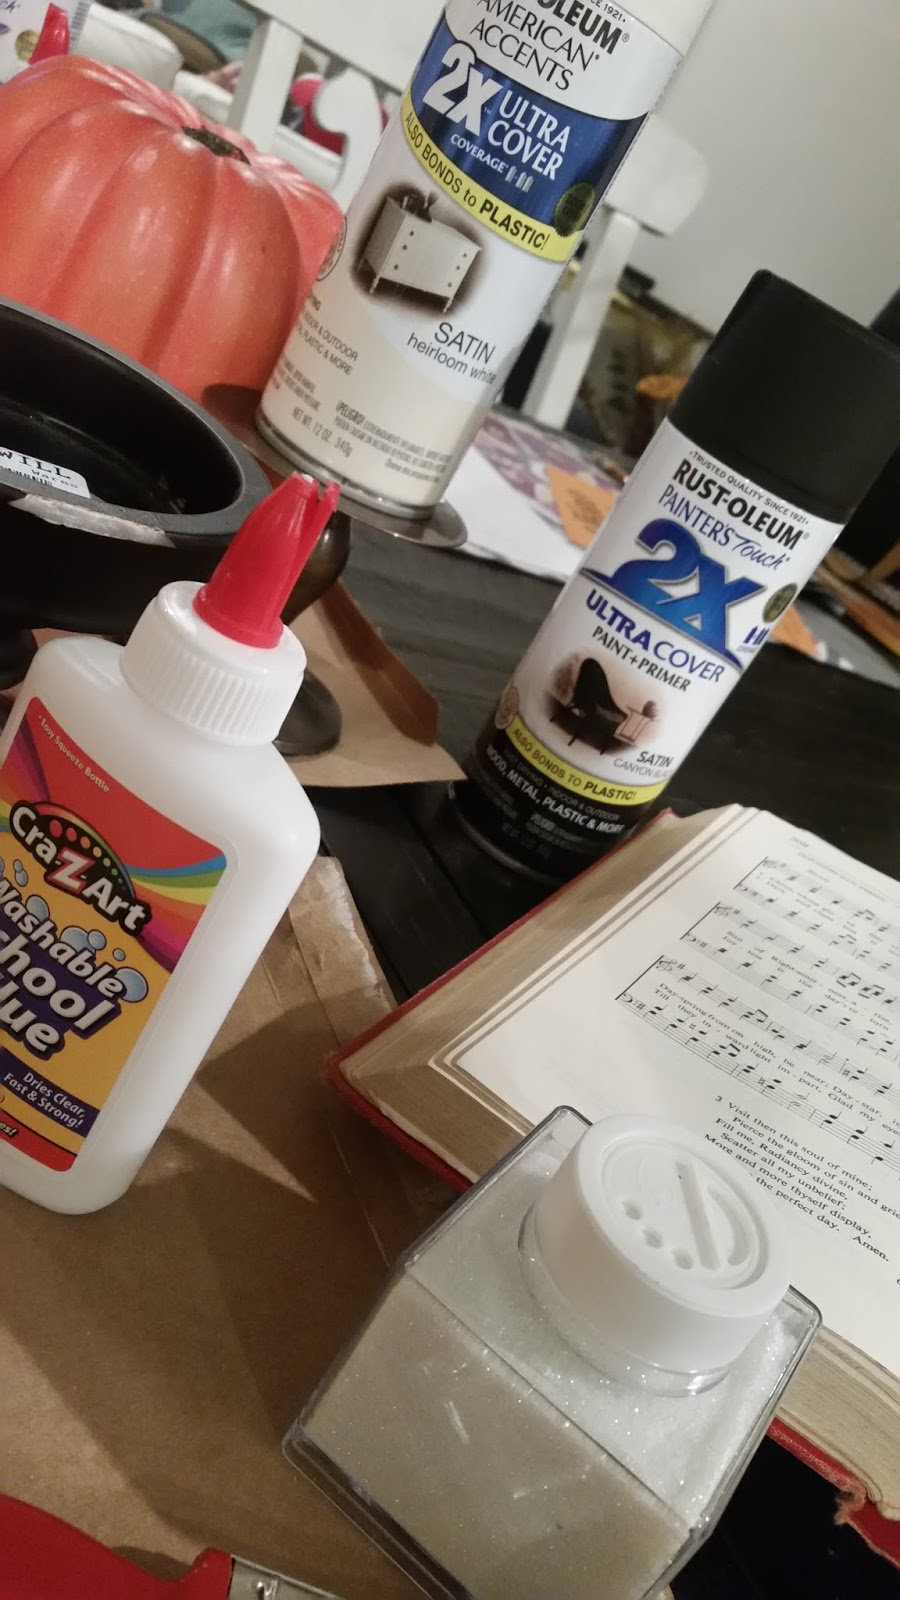
 In my collection of beautification supplies I had Rustoleum 2X Coverage in Antique White and Canyon Black. If you are going to have some supplies on hand that you will use over and over again...these should be it. I cannot begin to express to you what a simple coat of paint can do to transform something from an ugly duckling into something amazing. Case in point? Check out those three foam pumpkins that look all the same in the second picture. They cost a buck a piece at The Dollar Tree and they are super cheap looking- bright green stems and an orange that is a little too eager. Now check out what a few coats of the Rustoleum Antique White does to that same unfortunate pumpkin...
Granted I did pin on a little raffia bow and some "leaves" cut from sheet music but still...ummmm, SO much better than the original tacky orange outfit this little pumpkins showed up in...oh geez. And look at that totally outing my sweet tooth...my Moser Roth chocolate bar...


My last few pieces that needed makeovers were to give variation in height to the table's center display- I found two candle holders (different heights and shapes) and my FAVORITE piece -a cool "trivet" that I found at work one day. I was using it to give height in a display but decided that I actually needed to take it home and make it fabulous (once again I've found a job where I probably spend more than I make)...here's the poor dear's "Before'...
And that, my friends, is how this table was created by using some of the ugliest and homeliest finds in town. Honestly...anyone can do these things but it takes patience and the willingness deal with delayed gratification (HATE that sometimes, but so, so, so worth it). All of the work that went into this table took me less than a week- just a few evening with my favorite chocolate, whiskey and my current Netflix binge (which, at the time was Narcos, Season 2...addicting). One of the most gratifying parts of the whole project was putting all of my supplies away when I was done...away went the burlap, the sewing machine, the decoupage, the scissors, the scraps of paper...all of it went away and left a smattering of beautiful things that would work together to make my autumn table simply fab!
Next up...The Big Reveal...can't wait to share how it all came together!
A Cheap, Chic Chick, who was so inspired by how these projects came out that she really began to become obsessed with the resale shops again (#badhabit)
OK...so the runner? Check. Done.
Next up...what to do in the middle. I had an idea. The first thing I needed to do was round up a ton of pumpkins. They had to be small enough so that people wouldn't be trying to look around a pumpkin to talk across the table (nothing more annoying that having to strain to look over a centerpiece to talk to your dinner companions #thestruggleisreal) and I, of course, had an idea in my mind that I wanted all different sizes. I hit up Goodwill, Savers, St. Vinnie's and of course, my favorite spot- The Dollar Tree. You would not believe what an epic treasure trove that place can be. By the time I collected all of my pumpkins from the urban retail pumpkin patch I had a collection that looked like this...

 Super class and pretty, right? I mean it's not totally obvious that all of these pumpkins were like a dollar each or under is it? OK, really, it's a pretty abysmal collection of cheap overly bright foam pumpkins and some weird painted ones circa 1993.
The good news is that I had an arsenal of crafty type supplies to help give these pumpkins a makeover that would put the Elizabeth Arden counter at Macy's to shame- a little blush and some mascara can really only do so much in terms of a make-over, try spray painting the shit out of someone's face- THAT'S a makeover.
 In my collection of beautification supplies I had Rustoleum 2X Coverage in Antique White and Canyon Black. If you are going to have some supplies on hand that you will use over and over again...these should be it. I cannot begin to express to you what a simple coat of paint can do to transform something from an ugly duckling into something amazing. Case in point? Check out those three foam pumpkins that look all the same in the second picture. They cost a buck a piece at The Dollar Tree and they are super cheap looking- bright green stems and an orange that is a little too eager. Now check out what a few coats of the Rustoleum Antique White does to that same unfortunate pumpkin...
Granted I did pin on a little raffia bow and some "leaves" cut from sheet music but still...ummmm, SO much better than the original tacky orange outfit this little pumpkins showed up in...oh geez. And look at that totally outing my sweet tooth...my Moser Roth chocolate bar...

This stuff is AMAZING- all the taste and smoothness of expensive boutique chocolate for $1.99 (for four individual bars in each box). "Where on earth can I find such a dreamy sweet treat?" you ask. Well, I SUPPOSE I can divulge my secret...are you ready? Get ready to have your mind blown- Aldi. Yes, I said that- Aldi. This is real Germany chocolate and it's fabulous- great for a personal treat BUT also great for holiday gifts to neighbors, UPS delivery guys, hairdressers, sanitation workers- you name it. Who doesn't love a good chocolate?
Now that we've had that little break let's get back to the beautification process for these pumpkins. I spray painted about half of my pumpkins and then the other ones got a major transformation.
We started with covering up the green stem- no bueno. In my Perfect Fall Table Centerpiece there's no room for green- all white and cream. This took a couple of coats to cover the really awful green. I also chose to pull a few stems off to replace them with real pumpkins stems for some added visual interest.
 |
| As this was drying I mixed up my own concoction for a decoupage medium...super - glue and water. Done. I was going to add glitter but decided against it for the project- I'm pretty sure that the decoupaging I have on my agenda for the winter holidays will require glitter though. |
 |
| Instead of spending the money on expensive store bought decoupaging medium I mixed 1. c. of regular school glue and 1/3 c. of water. I happened to have an old peanut butter container in the recycle so I washed it out and am storing it in there- air tight so it doesn't dry out between projects. |

 |
| Now, what to do with the decoupage mixture? Get excited- I mean, I did!!! I decided that in addition to my painted pumpkins I wanted to add something for some visual interest. I have made wreaths our of book pages in the past and thought that would be the perfect addition to my table- words and, as it turned out, I was lucky enough to find a song book at well. A quick side note: I find destroying books for the sake of art to be nearly sacreligious. It almost hurts my heart to do that (yes, I'm a nerd like that). You have to find books that either a. deserve to be torn apart (see: Fifty Shades of Gray) or b. have no other useful purpose and you are actually giving them sustained life as their next stop is the great recycling bin in the sky. Helpful Hint: Books at The Dollar Tree are cheap...but sometimes your local library or some book stores are looking to just GIVE books away. Free is even better than a dollar. I don't math all that well but I know free is the best it can get...unless someone actually PAYS you to take the books. I have yet to have that happen but a girl can dream. I found that the easiest way to cover the pumpkins was to start off by cutting strips of paper and wrapping them around the pumpkin vertically....apparently there might have some a drinky-poo involved with this crafting project (see picture above...it's like an I Spy!). I mean as a general rule I don't consider myself crafty. I can sew, I can paint, I can do a lot of things but I cannot scrapbook. I think that is the epitome of craftiness and I pretty well suck at it. That said, it's a project that requires time and attention to detail so innately it also requires alcohol. It's a rule. I read it on Pinterest somewhere.  |

OK...I'm really struggling with the format of the blog and my pictures just kind of showing up wherever so bear with me. I always think there has to be an easier way to do things and usually there is...I typically find it after spending three hours doing it the hard way because I'm super efficient that way. But this is what the pumpkins look like as they start to take form with the decoupaging.
 |
| Again, nothing a few coats of my favorite Rustoleum Antique White couldn't fix right up...ohhhh, wait 'til you see her in the reveal pictures.... |
Next up...The Big Reveal...can't wait to share how it all came together!
A Cheap, Chic Chick, who was so inspired by how these projects came out that she really began to become obsessed with the resale shops again (#badhabit)

Comments
Post a Comment